Crafting with family during the holidays is one of the most enjoyable activities. It keeps children busy and inspires them to use their imaginations. While many materials are available for easy crafts to do at home, paper is a tried-and-true need for any artist.
You’ll discover that paper can be used to create infinite things. People of all ages can enjoy making paper crafts. Many of these projects are easy for children and toddlers to make and don’t require any special skills.
Below is a list of 10 easy crafts to make and sell with your children.
For Easy Crafts To Do At Home _ What Tools Will You Need?
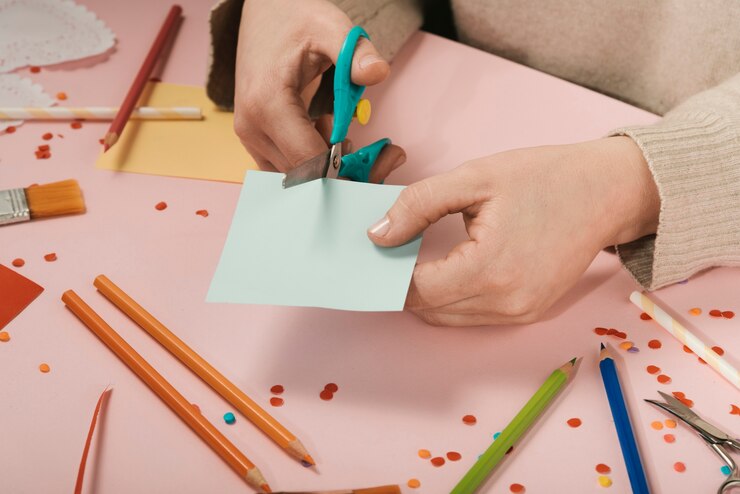
Although each paper craft project is different, almost all require specific tools. Cutters, scissors, glue, and tape are essential for accurate shaping and safe assembly. These fundamental materials are the cornerstone of easy crafts to do at home, allowing artists of all skill levels to adapt to various paper crafts.
When these are available, starting creative projects and realizing innovative ideas becomes simpler. Whether you’re creating decorations or easy crafts to make and sell, having these tools on hand can help you bring creative ideas to life.
Create Beautiful Beaded Paper Butterflies
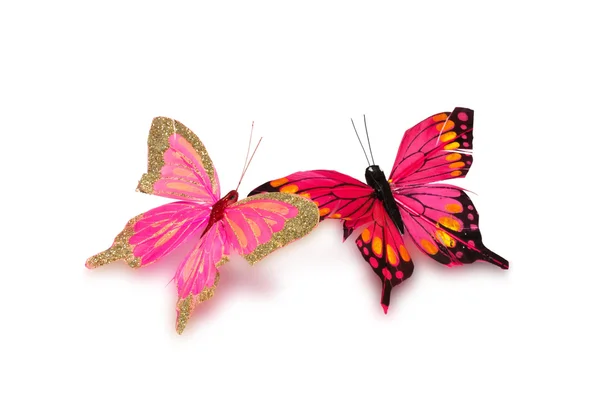
Add a touch of spring to your home with these beautiful beaded paper butterflies. These charming creations are sure to chase away the winter blues! Invite your kids to join the fun as you craft these lovely butterflies together. Here’s what you’ll need for this kind of easy crafts to do at home:
- Scissors
- Assorted beads
- Scrapbook paper
- Craft wire
- Optional: Paper scorer
Steps:
1: Cut out butterfly wings from scrapbook paper. You can trace the design first or find a butterfly template online to make it easier.
2: Score one-inch parallel lines across each wing.
3: Following the instructions, fold the scored lines on your wings.
4: Pinch the center of your wings together and bind them with craft wire, leaving some extra wire at the top. This wire will be used to create the butterfly’s antennas. For a decorative touch, you can add beads to the antennas.
Brighten Up Your Space with DIY Chinese Lanterns
You can make these vibrant lanterns to brighten your space anytime or save them for the holiday season. Either way, your kids will have a blast creating these colorful crafts. Here’s what you’ll need:
- Multicolored paper
- Scissors
- Tape
Step 1: Fold a piece of paper in half lengthwise. Next, cut strips from the fold, leaving about 2 centimeters from the end.
Step 2: Open the paper and roll it into a tube shape, then tape the shorter edges together.
Step 3: To make the lantern handles, cut out a small rectangle from the paper and tape it to the top, forming a handle.
Once your lanterns are ready, hang them up and enjoy their colorful charm!
Make a 3D Picture Frame to Treasure Memories

Create lasting memories with your child by making these charming 3D picture frames! It’s a simple and fun project for the entire family. Here’s what you’ll need for this kind of easy crafts to make and sell:
- Scissors
- Pencils
- Colorful cardstock
- Picture frame template
1: Print your picture frame template onto your chosen colorful cardstock.
2: Carefully cut out the square corners of the frame.
3: Let your kids get creative with decorating! They can use markers, colored pencils, or any other materials to add their personal touch.
4: Roll each edge tightly around a pencil, ensuring the decorated side faces outward. After rolling, slide the pencil out. This creates a fun “3D” effect for your frame. Finally, place your treasured photo inside to preserve your memories in style!
Craft a Colorful Paper Ice Cream Banner
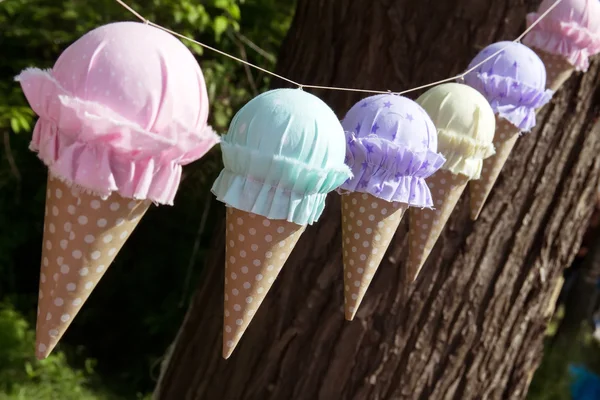
If you and your kids dream of enjoying cool ice cream cones on a hot summer day, why not bring that dream to life with a fun paper ice cream banner? These easy crafts to do at home will need the following materials:
- Multicolored patterned cardstock (preferably pastel colors) for the ice cream scoops
- Foam tape
- Hot glue
- Hole punch
- Scoring board
- Pink yarn
- Scissors
- Tan/brown paper for the cones and cherry stems
- Printable ice cream cone template
Step 1: Print the ice cream cone template and cut the cones from your tan or brown paper.
Step 2: To make the ice cream scoops, create paper rosettes. Cut 1.5-inch by 11-inch strips from your patterned cardstock. Using your scoring board, score the strips every ¼ inch, then accordion fold them. Adhere the ends together to create a loop.
Step 3: Cut a small square of paper and hot glue it to the center of the loop, pressing down until the glue holds. Once dry, add a matching patterned circle on top of each rosette to complete the scoop.
Step 4: Hot glue each ice cream rosette to the cone, then add little paper cherries on top of the scoops for extra fun.
Step 5: Turn your ice cream cones into banners by cutting a circle from cardstock and punching two holes. Attach the circle to the back of each cone with foam tape, then thread pink yarn through the holes.
Now you have a cute ice cream cone banner perfect for a birthday party or adding a sweet summer touch to your space!
DIY Paper Pinwheels for Festive Celebrations

These paper pinwheels are the perfect addition to your 4th of July celebrations or any festive summer gathering that needs a touch of fun and flair. Here’s what you’ll need to create this delightful craft:
- Hot glue gun
- Wooden dowels
- Small brads
- Red, white, and blue paper (metallic paper adds a lovely sheen)
- A cutting machine like the Cricut Explore
Step 1: Use the template provided to cut out each pinwheel shape.
Step 2: Move the holes along the outer edges of the pinwheel toward the center. Thread a brad through all five holes and open the clasp to secure the pinwheel in place.
Step 3: Attach a wooden dowel to the back of each pinwheel with hot glue.
Now you’ve got fun, decorative pinwheels that will steal the spotlight at your next celebration!
Design a Rainbow Paper Chain Wall Hanging
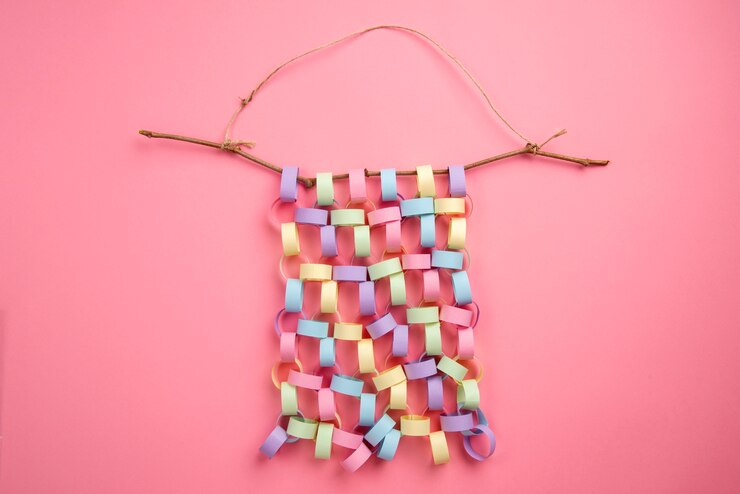
This project will add fun, creative inspiration and a personalized touch to any bedroom. Instead of spending money on expensive artwork, why not decorate your walls with your child’s vibrant artwork? This papercraft can also catch the interest of teens. Here’s what you’ll need:
- Rainbow template (available here)
- Scissors
- Dowel
- String
- Multicolored cardstock (colors like tan, light pink, coral, and mustard yellow)
Step 1: Plan your design. The rainbow template features squares representing two links each. For a smaller display, you can use just one link per square.
Step 2: Cut strips of cardstock in the rainbow colors you chose. Each strip should be about 6 inches long and 1 inch wide. Use the example photo above as a guide.
Step 3: Make the rainbow chains. Hot glue the ends together to form rings to create loops, then connect each strip into a chain following the template for reference.
Step 4: Once your rainbow chains are ready, slide the top of each chain onto a dowel. Attach a piece of sturdy string to the dowel and hang it up to showcase your creation!
Get Inspiration from DIYsFun Today
Crafting with paper is a simple yet fulfilling activity that brings joy to people of all ages. Whether you’re creating colorful butterflies, festive lanterns, or charming picture frames, these easy crafts to make and sell encourage creative inspiration and provide a fun bonding experience with your family.
The best part? Paper crafts require minimal materials and are budget-friendly, making them accessible to everyone. So gather your supplies, unleash your imagination, and start crafting today! These delightful projects will brighten your home and create lasting memories with your loved ones. For more DIY projects and ideas, visit DIYsFun today.